Self-Hosting Next.js on a VPS - End-to-End
TL;DR: How to self-host Next.js (using the page router) for 5k users per day
- OS: Ubuntu (latest LTS version)
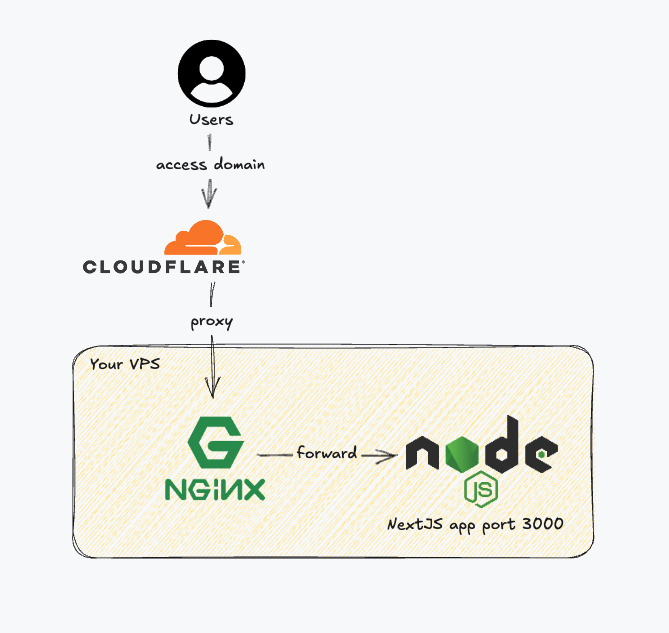
- CDN: Cloudflare
- Deploy: Docker
- Reverse proxy: NGINX
- Database: PostgreSQL
- Monitoring: New Relic, Sentry
- Logging: Telegram
- Backup: Cloudflare R2
- Secure: UFW, Fail2Ban, VPS Firewall
Why did I write this blog?
I'm a big fan of Next.js, and I'm also a big fan of self-hosting. I learned so much when I self-hosted my app on a VPS instead of just hitting the deploy button on Vercel.
When do you need to self-host your Next.js app?
- You want to have full control over your app.
- Your app consumes a huge amount of resources and bandwidth.
- You want to learn more about DevOps.
- You want to host a database on the same VPS.
Other blogs may guide you on how to set up your Next.js app on a VPS, but I want to walk you through setting up your Next.js app end-to-end—from deploying it and auto-deploying it to securing and scaling it.
We will make it work > optimize it > secure it > make it fast > make it stable.
Let's go 🏃➡️
1. Make it work
#Pick a provider
From personal experience, I recommend these providers as they offer the best price/performance ratio:
- DigitalOcean: Great UI, super stable, free DDoS protection.
- Linode: Great price, great performance, free DDoS protection.
- Vultr: Great price, great performance, DDoS protection for $10/month.
I would recommend DigitalOcean because it's the easiest to use, stable, and its free DDoS protection is a big plus. Additionally, it provides many other services like managed databases, app platforms, functions, etc. Everything comes with a great UI and is very user friendly.
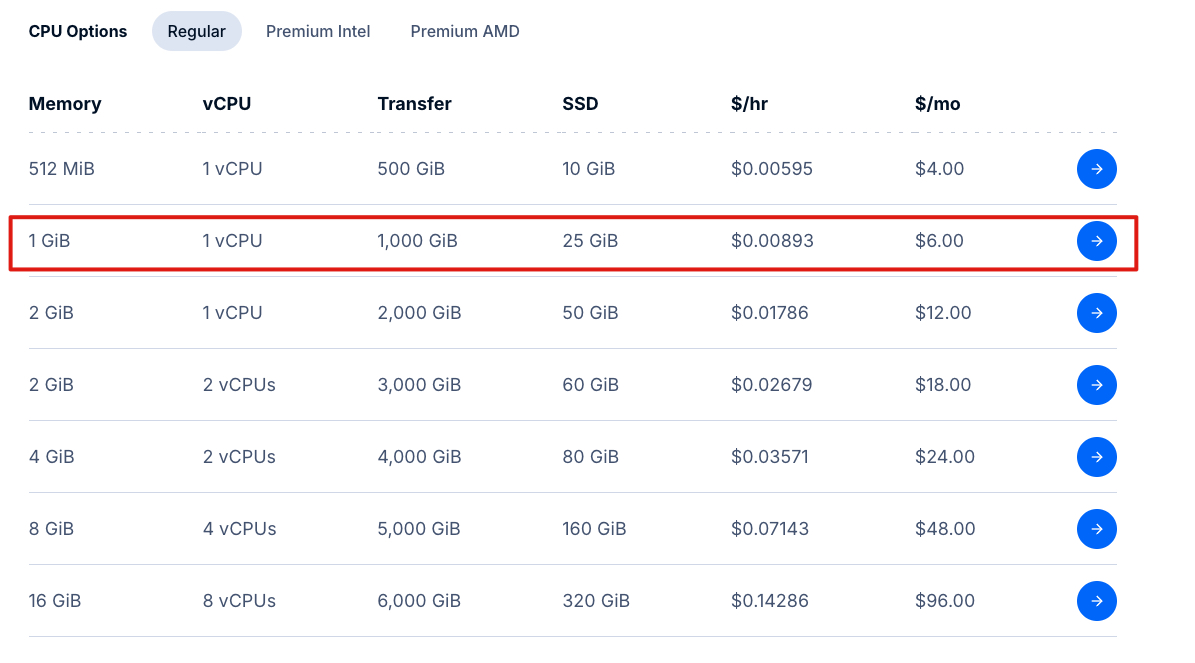
For one Next.js app plus one database, a $6 plan with 1 vCPU, 1GB RAM, and 25GB SSD storage should be enough.
You can use my referral link to get $200 credit (60 days) for free: DigitalOcean
#Set up your VPS
Now, let's set up your VPS. This is my recommended setup:
- Docker: For easy deployment and management.
- NGINX: Reverse proxy.
- PostgreSQL: Database.
- UFW, Fail2Ban: For security.
- VPS Firewall: Use your provider's firewall and, if using Cloudflare, allow only Cloudflare IPs.
You may wonder why we even need Docker for a single, small Next.js app. Isn't that overkill?
But hear me out—even though you might have a $5 VPS, it won't appreciate you when building the black hole of dependencies in your app. The build step consumes a huge amount of resources, and many times my build step failed due to JavaScript heap out of memory.
Check out this script deploy.sh to automate the setup process of your server.
#Run your Next.js app
For reference, I think the best template is Leerob's template.
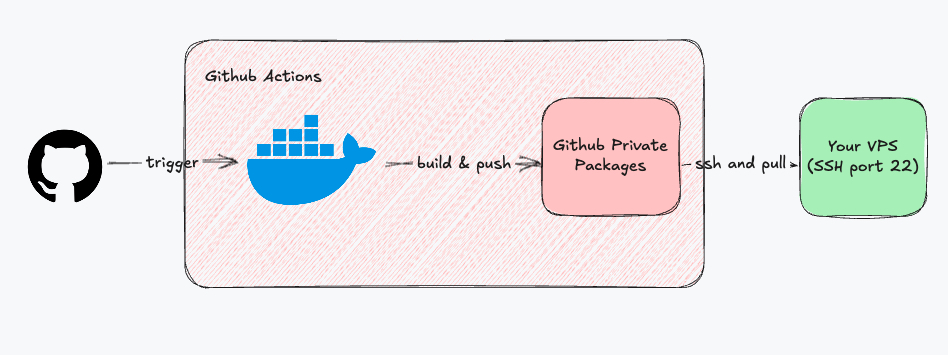
For auto-deployment, it's better to have GitHub Actions build your app, dockerize it, push the image to a private registry, and then on your VPS, you simply pull the image and run it. Next.js's build step is a nightmare for a $5 VPS.
This is my GitHub Actions workflow for auto-deploying each time I push to the main branch. It builds the app, dockerizes it, pushes the image to GitHub Package Registry, then SSH's into your VPS to pull the image and run it.
You will need to set up the following secrets in your GitHub repository:
GITHUB_TOKEN: (Automatically generated by GitHub)SSH_HOST: Your VPS IP address.SSH_USERNAME: Your VPS username.SSH_PORT: Your VPS port.SSH_PRIVATE_KEY: Your VPS private key.
name: Build and Deploy to VPS

on:
  push:
    branches:
      - main

env:
  REGISTRY: ghcr.io
  IMAGE_NAME: ${{ github.repository }}

jobs:
  build-and-deploy:
    runs-on: ubuntu-latest

    permissions:
      contents: read
      packages: write

    steps:
      - name: Checkout code
        uses: actions/checkout@v4

      - name: Log in to the Container registry
        uses: docker/login-action@v3
        with:
          registry: ${{ env.REGISTRY }}
          username: ${{ github.actor }}
          password: ${{ secrets.GITHUB_TOKEN }}

      - name: Extract metadata (tags, labels) for Docker
        id: meta
        uses: docker/metadata-action@v5
        with:
          images: ${{ env.REGISTRY }}/${{ env.IMAGE_NAME }}
          tags: |
            type=ref,event=branch

      - name: Build and push Docker image
        uses: docker/build-push-action@v5
        with:
          context: .
          push: true
          tags: ${{ steps.meta.outputs.tags }}
          labels: ${{ steps.meta.outputs.labels }}

      - name: SSH into VPS then pull image and run
        id: deploy
        uses: appleboy/ssh-action@v1.0.0
        env:
          IMAGE_TAG: ${{ steps.meta.outputs.tags }}
          GITHUB_USERNAME: ${{ github.actor }}
          GITHUB_TOKEN: ${{ secrets.GITHUB_TOKEN }}
        with:
          host: ${{ secrets.SSH_HOST }}
          username: ${{ secrets.SSH_USERNAME }}
          key: ${{ secrets.SSH_PRIVATE_KEY }}
          port: ${{ secrets.SSH_PORT }}
          envs: GITHUB_USERNAME, GITHUB_TOKEN, IMAGE_TAG
          script: |
            echo $GITHUB_TOKEN | docker login ghcr.io -u $GITHUB_USERNAME --password-stdin
            docker pull ghcr.io/$GITHUB_USERNAME/$IMAGE_NAME:$IMAGE_TAG
            docker stop $(docker ps -a -q)
            docker system prune -f
            docker run --name next-app -dit ghcr.io/$GITHUB_USERNAME/$IMAGE_NAME:$IMAGE_TAG
2. Make it optimize
#Avoid Unnecessary Requests Hitting Your Server
To reduce the load on your VPS, you need to make some changes to avoid unnecessary requests.
Next.js (using the page router) has several kinds of requests:
/{page_name}: normal page requests/{static_files}: static files in the public folder/api/*: API route requests/_next/image: optimized images/_next/static: static files/_next/data: data fetching
If you proxy your server through Cloudflare (and you should), you can use Cloudflare's CDN to cache your static files and images.
Cloudflare CDN already caches all of your static files (JS, CSS, fonts) by default as their filenames are hashed when the content changes. However, for files in the public folder and for /_next/image, you need to set custom cache rules.
- For files in the public folder, you can place them in a specific subfolder (such as
public/__images) and set a cache rule to cache them for one year. Note that if you want to update them, you need to use a different name to avoid cache hits that would show outdated content. - For
/_next/image, you can set a cache rule to cache them for one year—either by ignoring the cache-control header or by setting a fixed TTL.
#Avoid Unnecessary Server-Side Rendering
Believe me, SSR consumes a lot of resources, and it is not advisable to use it for every page of your app.
- Use Static Site Generation (SSG) for pages that are static.
- Use Incremental Static Regeneration (ISR) for pages that can be pre-rendered at build time but also updated on demand.
Mastering ISR can be a little tricky, but it's worth it.
3. Make it secure
#Secure your server
#UFW
DigitalOcean has a great tutorial on how to set up UFW on Ubuntu.
Make sure to allow the SSH port (22) before enabling UFW, or you will not be able to SSH into your server.
Note: When you use Docker, it uses iptables directly and UFW might not work as expected. You may need to use iptables to manage port access.
#Fail2Ban
Your server is exposed to the internet, and someone could attempt to brute-force SSH to guess the password. Use Fail2Ban to block an IP address after a certain number of failed attempts.
Again, DigitalOcean has a great tutorial on how to set up Fail2Ban on a Linux server.
#VPS Firewall
Every VPS provider offers a firewall to control incoming and outgoing traffic.
If you use Cloudflare, set up the firewall to allow only traffic from Cloudflare's IP addresses (Cloudflare IPs). This prevents direct traffic to your server's IP.
4. Make it fast
#Caching
[... additional content about caching ...]
5. Make it stable
#Monitoring
#New Relic
New Relic has a generous free tier and is very simple to set up. You can use it to monitor your server, your app, your database, etc.
I use it to monitor my server and containers.
#Sentry
Sentry has become the de facto standard for error monitoring. It is very easy to set up and free for small usages. However, honestly, the free tier isn't enough for me, so I log errors to Telegram.
#Logging
I log everything in my app using a Telegram bot. It's simple, and many SDKs support it.
Note that Telegram has a rate limit, so make sure to configure it correctly to avoid hitting that limit. (I use a queue with BullMQ to send messages.)
#Backup
As you run your database on the server, it is essential to back it up.
You can use any S3-compatible storage for backups. I use Cloudflare R2 for mine.
I set up a JavaScript script to run as a cron job to back up my database every day at 12:00 AM UTC. PM2 makes this easy.
// backup.js
const fs = require("fs");
const path = require("path");
const dayjs = require("dayjs");
const mysqldump = require("mysqldump");
const { S3Client, PutObjectCommand } = require("@aws-sdk/client-s3");

const s3 = new S3Client({ ... });
const dbConnection = '...';

const FOLDER_PATH = "/path_backup";
const fileName = `${dayjs().format("DD_MM_YYYY_HH_mm_ss")}_backup.sql`;
const backupPath = path.join(FOLDER_PATH, fileName);

if (!fs.existsSync(FOLDER_PATH)) {
  fs.mkdirSync(FOLDER_PATH);
}

console.log(">>> Start backup database ...");

mysqldump({
  connection: dbConnection,
  dumpToFile: backupPath,
})
  .then(async () => {
    const fileSize = fs.statSync(backupPath).size;

    console.log(`>>> Backup file ${backupPath} created successfully`);
    console.log(`>>> Backup file size ${fileSize}`);

    // upload the file to S3
    const fileBuffer = fs.readFileSync(backupPath);

    const command = new PutObjectCommand({
      Bucket: 'your_buck_name',
      Key: fileName,
      Body: fileBuffer,
    });
    await s3.send(command);

    console.log(`✅ Backup file ${fileName} uploaded to S3 successfully`);

    fs.unlinkSync(backupPath);
  })
  .catch((error) => {
    console.log(`❌ Error creating backup file: ${error}`);
  });
pm2 start backup.js --cron "0 0 * * *"Happy coding! 🚀